Photo Recovery on Macbook
Nowadays, more and more users like to store massive photos recording happy moments and memories in their life on Mac computer because of its outstanding performance. Although Mac OS is very excellent, it cannot ensure the data security. Data loss frequently happens due to hacker invasion, mistaken deletion and other factors. Since photos are reminders of memorable moments, users will feel very sad when losing them. Although data recovery apps can help to recover lost photos, most of them don’t support Mac OS. So well, how to perform photo recovery on Macbook?
To recover lost files from Mac OS, users can turn to Mac data recovery app. We suggest trying MiniTool Mac Data Recovery because it can help to recover data that has been lost in a variety of reasons, including accidental partition deletion or formatting, computer virus attack and other factors. Besides, it is a read tool which will not influence the original data all the time.
How to Carry Out Photo Recovery on Macbook
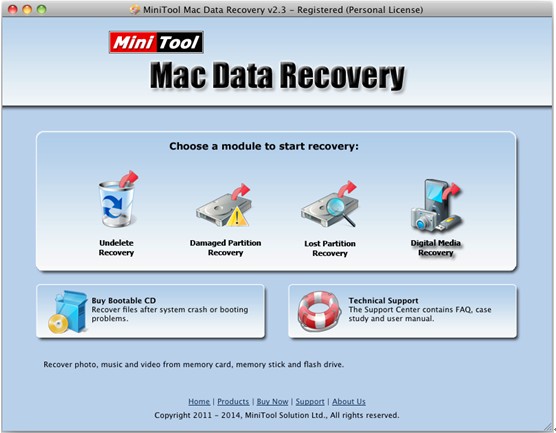
Users are suggested downloading and installing this professional recovery tool on computer before recovering data. Note: never install it on the drive containing lost data since that can cause data loss permanently. It’s recommended to run it on a separate and healthy drive. And then, users can see its main interface after launching it.
At this time, 4 different data recovery modules are shown, and each of them is designed to meet a different data loss scenario. So users can select a suitable one according to actual situations to start recovery session. And, users don’t need to worry about their poor computer knowledge since it provides wizard-based operation and simple interfaces which don’t require advanced technology and skills. To complete photo recovery on Macbook, users can choose the “Digital Media Recovery” feature because it is specially designed to restore lost photos, music and video files.
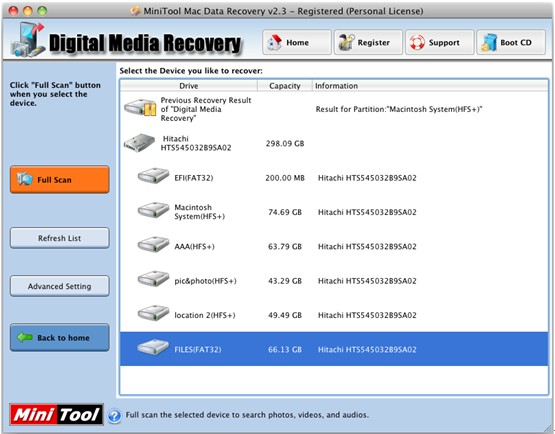
In this window, select the device where photo loss emerges and click “Full Scan” button on the left.
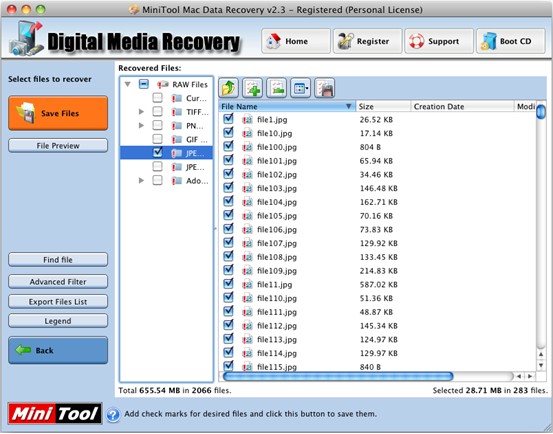
After scanning, MiniTool Mac Data Recovery displays the results in a neat tree view as above. Now, select the desired files which need recovering and click “Save Files” to store them on a safe place. If users are not sure the selected photos, they can click the “File Preview” feature to view them before storing. Besides, if users happen to remember the file name, they can quickly find the desired files via the “Find File” feature.
Note: when storing recovered files, users are suggested storing them on another drive to avoid overwriting the original data.
See! The task of photo recovery on Macbook can be easily solved without influencing the original data as long as users turn to a professional Mac data recovery app.
Related Articles:
Data Recovery Software

- $69.00

- $79.00

- $69.00
- Data Recovery Software
- License Type
Windows Data Recovery Resource
Mac Data Recovery Resource
Contact us
- If you have any questions regarding online purchasing (not technical-related questions), please contact our sales representatives.
Tel: 1-800-789-8263
Fax: 1-800-510-1501


